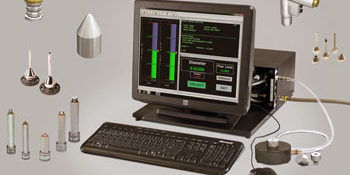
There are numerous parts that make use of very small holes in various industries (or in your garage). I can think of maybe a dozen, but the most common ones seem to be aerosol cans, needles for delivering fluids and medicines, fuel injection nozzles, and simple fixed restrictors used to control liquid or air flows. Typically, holes for these types of applications range from 0.1 mm to 1 mm in diameter. Some of these small holes are not that important, but when it comes to delivering fuel or coatings, the size of the hole may increase or decrease fuel efficiency, or determine the quality of the paint job on your mailbox. And if the delivered product is medicine, hole size may have life or death consequences.
Many methods exist to inspect small holes. Some applications are served well by microscopes and optical comparators, although neither is well-suited to high-volume production applications, and both are limited in the part configurations they can accept. For example, if the hole is deep within the part, or the hole is the length of a shaft like a hypodermic needle, measuring microscopes probably won’t work. By the same token, go/no-go gaging with precision wires is also practical only for very low-volume tasks. So how does one measure these very small holes that control flow?
Air gaging may be a choice to consider. Conventional air gaging for measuring inside diameters is typically limited to a minimum size of about 0.060″/1.52 mm. Below that, it becomes difficult to machine air passages in the plug tooling and accommodate the precision orifices or jets. But air gaging is among the most flexible of inspection methods, and with a simple change of approach, it can be used to measure very small through holes down to 0.1 mm.
Most air gages measure backpressure that builds up in the system when the tooling is placed in close proximity to a workpiece. In the case of bore gaging, a smaller bore means closer proximity of the part surface to the jets. This results in higher air pressure, which the gage comparator converts into a dimensional value.
Some air gages measure the rate of flow through the system rather than backpressure; as tool-to-workpiece proximity decreases, flow also decreases. The flow principle can be effectively applied to measure very small through holes, even on air gages that were designed to operate on the backpressure principle. Rather than installing tooling at the end of the air line, the workpiece itself is connected to the line. Smaller bores restrict the flow of air more than larger ones. Thus, the workpiece essentially becomes its own gage tooling. This approach works on all common types of backpressure gages: single-leg gages requiring dual setting masters, as well as differential-type gages, which typically use just one master.
Air flow is proportional to the bore’s cross-sectional area, but area varies with the square of diameter. Gage response in this setup, therefore, is non-linear. Nevertheless, this rarely causes problems, because the range of variation to be inspected is usually very small, and the gage is typically set to both upper and lower limits using dual masters or qualified parts. Therefore, a specially modified bench air gage amplifier or pneumatic column gage can be dedicated to measuring this small range.
The ideal gage for the user, however, has as much flexibility built into the system as possible. What this means is the ideal solution is to be able to measure anything within the 0.1 mm to 1 mm range and thus eliminate the short-range dedicated system. To do this, there is the small equation we mentioned previously: air flow is proportional to the bore’s cross-sectional area, but area varies with the square of diameter. Therefore, if a long-range system is required, linearization is a must. Using two masters over the full range of the hole diameters would not provide the performance required. And there is one more issue. Most pneumatic sensors cannot be set up to handle the long range needed and still maintain the resolution and performance required.
With the use of a gaging computer in conjunction with a series of pneumatic transducers, each tuned for its own small range, the computer can sense where the sample part is falling in terms of flow with the proper pneumatic transducer and use that one for the hole measurement. Also, since each transducer has been linearized to correct for the squaring of flow for the size change, hole sizes can be measured to an accuracy of better than 7.6 µm.
With a linearized and multiple pneumatic transducer system, the operator can simply place any part onto the gage and it will provide the hole diameter and the flow rate based on the pressure used in the system.
In discussing air gaging in past columns, we’ve often emphasized its flexibility. With it, one can measure a wide range of dimensional characteristics, including inside and outside diameters, feature location, thickness, height, and clearance/interference. Air can also be used to measure geometric characteristics such as roundness, squareness, flatness, parallelism, twist, and concentricity. And we’ve seen how air gages can measure very deep bores, blind holes, and counterbores. The use of air gaging to inspect very small through holes is yet another example of the tremendous adaptability of this relatively simple, but very cost-effective, technology.

The use of air gaging to inspect very small through holes is yet another example of the tremendous adaptability of this relatively simple, but very cost-effective, technology.


